Imagine a dessert that combines the soft, fudgy richness of brownies with the gorgeous red hue of red velvet cake. Sounds like the perfect indulgence, right? Well, get ready to meet your new favorite treat: Red Velvet Brownies!
Table of Contents
Introduction
There’s something so luxurious about red velvet. Its vibrant ruby-red color, its subtle cocoa flavor, and that irresistible balance of sweetness and tanginess make it a classic dessert choice. But have you ever thought of taking that iconic red velvet magic and fusing it with the richness of brownies? Enter Red Velvet Brownies: soft, chewy, and insanely decadent—each bite feels like a celebration.
Fun fact: Did you know that red velvet cake was originally made without food coloring? The red hue came from natural cocoa’s reaction with acidic ingredients like vinegar or buttermilk. While today it’s achieved with food coloring, it still carries that iconic flavor profile we all love.
What makes this recipe special? Simplicity. These brownies look bakery-worthy but are incredibly easy to make, even for beginner bakers. They take about 30 minutes from start to finish, so whether you’re looking for a last-minute dessert or a unique addition to a party platter, this recipe has you covered. And the best part? They’re a hit with both kids and adults, making them ideal for family gatherings.
If you’ve tried our Chewy Chocolate Brownie Recipe, think of these as their vibrant cousin. The same rich and indulgent texture, but with a twist of red velvet charm. Trust us—your taste buds will thank you! Ready to bake up some red velvet love? Let’s do this!
What Are Red Velvet Brownies?
Great question! You may have heard of red velvet cake, but what about Red Velvet Brownies? Are they just brownies in disguise with a fancy name? Well, not exactly. These beauties pack all the classic elements of red velvet in brownie form: subtle cocoa flavor, a hint of tanginess, and that bold red color that immediately catches your eye.
Here’s a fun anecdote: Some say that red velvet desserts have a flair for romance because of their rich color—making them a popular treat for Valentine’s Day. But honestly, I could eat these brownies any time of the year. And let’s not forget the saying “the way to a man’s heart is through his stomach.” Spoiler alert: These brownies will work their charm on everyone, no matter the occasion.
So, are you intrigued? I thought you might be! Keep reading to learn how to create this showstopping dessert with ease.
Why You’ll Love These Red Velvet Brownies
If you need more reasons to make these brownies ASAP, here are three key highlights that make them truly irresistible:
1. Perfect Texture and Flavor
These brownies are the best of both worlds: soft and fudgy inside, with just the right amount of chewiness around the edges. They’re rich and chocolatey but not overwhelmingly so, thanks to that perfect mix of cocoa powder, vanilla, and a touch of tang from the cream cheese layer (if you choose to add it).
2. Save Money by Baking at Home
We all love a gorgeous dessert that looks like it came from a fancy bakery. But let’s face it—those can burn a hole in your wallet. By making these red velvet brownies at home, you can create a dessert that’s just as beautiful and flavorful at a fraction of the cost. Plus, you already have most of the ingredients in your pantry!
3. Customizable Add-Ins
Want to make your brownies even more indulgent? Throw in some white chocolate chips for a creamy contrast, or swirl in cream cheese for a cheesecake-inspired twist. You can also add a drizzle of melted dark chocolate on top for a dramatic finishing touch.
Comparing this recipe to our Classic Chocolate Fudge Brownies, these red velvet brownies add a bold visual flair and unique flavor—perfect when you’re craving something special. Ready to give them a try? Grab your mixing bowl, and let’s get started!
How to Make Red Velvet Brownies
Quick Overview
These Red Velvet Brownies are ridiculously easy to make. With just one bowl (yay for less cleanup!), a few pantry staples, and about 30 minutes of your time, you can whip up a dessert that looks like it took hours. Whether you’re a novice in the kitchen or a baking pro, this recipe is foolproof and guaranteed to impress.
Preparation Time: 10 minutes
Baking Time: 20-25 minutes
Total Time: 30-35 minutes
Let’s dive into the details!
Key Ingredients for Red Velvet Brownies

To make these vibrant and delicious brownies, you’ll need the following:
- All-Purpose Flour (1 cup): The foundation of your brownies.
- Unsweetened Cocoa Powder (2 tablespoons): For that gentle chocolatey flavor.
- Granulated Sugar (1 cup): Adds sweetness and balance.
- Unsalted Butter (1/2 cup, melted): Creates a fudgy and rich texture.
- Eggs (2 large): Essential for binding and structure.
- Vanilla Extract (1 teaspoon): Adds a layer of sweetness and warmth.
- Red Food Coloring (1-2 teaspoons): The key to that signature red velvet look.
- White Vinegar (1 teaspoon): A surprising ingredient that enhances the red color and activates the cocoa.
- Salt (1/4 teaspoon): Balances out the sweetness.
- Optional Add-Ins: White chocolate chips, cream cheese swirls, or dark chocolate chunks.
Step-by-Step Instructions

Step 1: Preheat the Oven and Prepare the Baking Pan
Preheat your oven to 350°F (175°C). Line an 8×8-inch baking pan with parchment paper for easy removal, and lightly grease it with nonstick spray.
Step 2: Mix the Wet Ingredients
In a medium bowl, whisk together melted butter, sugar, eggs, vanilla extract, red food coloring, and vinegar until smooth and shiny.
Step 3: Combine Dry Ingredients
In a separate bowl, sift together the flour, cocoa powder, and salt. Gradually add this mixture to the wet ingredients, stirring until just combined. Do not overmix, as this may result in dense brownies.
Step 4: Add Optional Toppings
If you’re using white chocolate chips or cream cheese, gently fold them into the batter at this stage.
Step 5: Bake
Pour the batter into the prepared pan, smoothing it out with a spatula. Bake for 20-25 minutes, or until a toothpick inserted into the center comes out with a few moist crumbs.
Step 6: Cool and Slice
Allow the brownies to cool completely in the pan before slicing them into squares. For cleaner cuts, chill the brownies in the fridge for 15-20 minutes before slicing.
Voila! Your red velvet brownies are ready to steal the show.
What to Serve Red Velvet Brownies With
These decadent brownies are a treat on their own, but here are a few ways to elevate them:
- Vanilla Ice Cream: Nothing beats the warm-and-cold combo.
- Whipped Cream: Adds a light, airy touch to the rich flavor.
- Fresh Berries: Strawberries or raspberries provide a fruity balance.
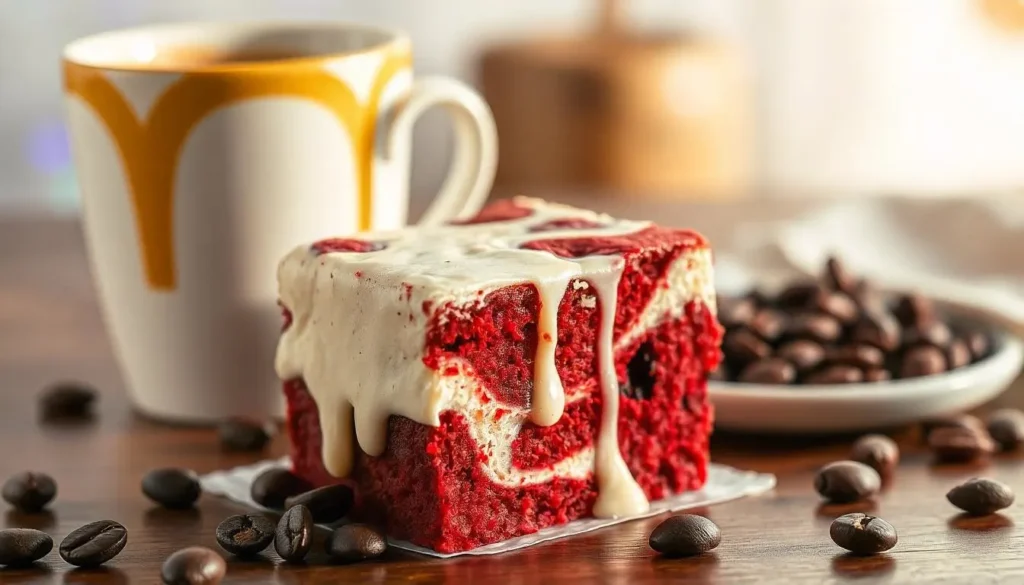
- Hot Coffee or Latte: The perfect pairing for an afternoon pick-me-up.
Top Tips for Perfecting Red Velvet Brownies
- Don’t Overbake: Take them out when the center is still slightly gooey; they’ll continue to set as they cool.
- Use Gel Food Coloring: For a vibrant red color, gel works better than liquid food coloring.
- Experiment with Add-Ins: Swirl in cream cheese or sprinkle some candy pieces on top for a twist.
- Chill for Cleaner Cuts: Cold brownies are easier to cut into clean squares without crumbling.
Storing and Reheating Tips
- Storage: Keep brownies in an airtight container at room temperature for up to 3 days, or refrigerate for up to a week.
- Freezing: Wrap individual brownie squares tightly in plastic wrap and freeze them for up to 3 months. Thaw at room temperature when ready to enjoy.
- Reheating: For that fresh-baked taste, warm them in the microwave for 10-15 seconds.

Top 10 FAQs About Red Velvet Brownies
If you’re here to learn all about Red Velvet Brownies, you’re in the right place! Below are answers to the 10 most frequently asked questions about these decadent treats, covering everything from common issues to fun tips that will make your brownies even better.
1. What Are Red Velvet Brownies?
Red Velvet Brownies are a fusion of red velvet cake and classic brownies. They’re soft, fudgy, and chewy, with the distinctive red velvet flavor that combines subtle cocoa, tangy sweetness, and a splash of vanilla. They’re also famous for their vibrant red color, which makes them perfect for special occasions like Valentine’s Day or Christmas.
2. Why Are They Called “Red Velvet”?
The “velvet” part comes from their super-soft, velvety texture. The “red” comes from the coloring in the recipe, which gives them their iconic hue. Historically, red velvet desserts got their color from the reaction between natural cocoa powder and acidic ingredients. Today, food coloring enhances their signature bold red tone.
3. Do I Need Food Coloring to Make Red Velvet Brownies?
No, food coloring is optional. If you skip it, the brownies will still taste the same—they’ll just lack the vibrant red color. If you’re looking for a natural alternative, try using beetroot powder for a reddish tint without artificial dyes.
4. Can I Add Cream Cheese to Red Velvet Brownies?
Absolutely! Cream cheese pairs wonderfully with red velvet flavors. Swirl softened cream cheese into the batter before baking for a tangy, cheesecake-like layer that complements the fudgy brownies perfectly.
5. How Do I Make My Brownies Soft and Chewy?
Here’s the secret: don’t overmix your batter and avoid overbaking. Mix your ingredients until just combined, as overmixing could make the brownies dense. Bake until a toothpick inserted into the center comes out with a few moist crumbs—this ensures a soft, fudgy interior.
6. How Do I Achieve the Best Red Color?
To get that bold red hue, use gel or paste food coloring instead of liquid. Gel food coloring is more concentrated, so you won’t have to use as much, which prevents altering the texture of your brownies.
7. Can I Freeze Red Velvet Brownies?
Yes, Red Velvet Brownies freeze well! Once cooled, slice them and wrap each piece individually in plastic wrap. Store them in an airtight container or freezer-safe bag. They’ll keep for up to 3 months. When ready to eat, let them thaw at room temperature or heat them in the microwave for a few seconds.
8. How Long Do Red Velvet Brownies Stay Fresh?
When stored in an airtight container, these brownies stay fresh for 3-4 days at room temperature. Alternatively, you can refrigerate them for up to a week. To restore their soft texture, warm them slightly before serving.
9. Can I Add Other Toppings?
Yes! Red Velvet Brownies are super versatile. Add white chocolate chips, drizzle melted chocolate on top after baking, or sprinkle powdered sugar for an easy decorative touch. You can even top them with a cream cheese frosting for a classic red velvet twist!
10. Can This Recipe Be Doubled?
Certainly! If you’re baking for a crowd, simply double the recipe and bake it in a larger pan. Adjust the cooking time as needed—watch closely to avoid overbaking. Always test doneness with a toothpick!
Final Thoughts
These Red Velvet Brownies are the perfect combination of flavor, texture, and visual appeal. Whether you’re serving them at a party, surprising your loved ones, or simply indulging yourself (which is totally encouraged!), they’re guaranteed to be a hit. With simple ingredients and quick steps, they’re perfect for any baking level.
So what are you waiting for? Grab your apron, whip up a batch, and enjoy the magic of red velvet in brownie form. Happy baking! 🍫❤️